Emailer Plugin Details
The emailer plugin enables Directory Monitor send emails as a reaction to events that occur against a specified directory.
The first step to configuring the emailer is to setup your mail server settings by navigating to File -> Options -> Emailer
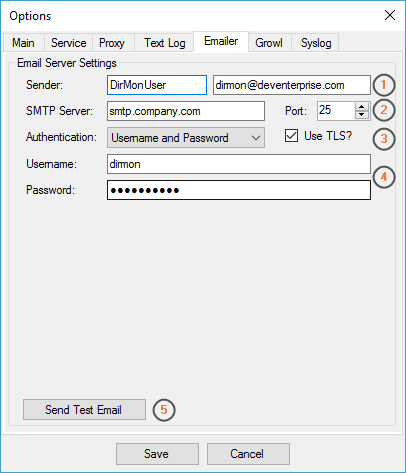
Setup the name and email address that emails will appear to originate from. If you plan on categorizing the emails in your inbox, use a unique name such as "Directory Monitor".
Configure the SMTP details for the email relay server you will be using to send emails with. Popular providers such as Gmail and Yahoo allow users to make use of their SMTP servers and provide the correct values for you. For internal emails please speak to your network administrator to retrieve the required details.
Most email relay servers require authentication. Choose the authentication type you want to use and provide and further details if necessary.
Warning: If you are using Directory Monitor as a background service then be careful when selecting "Windows (NTLM)", the installed service user may not be authorized to send email.
Depending on the authentication type selected, you may need to provide a username and password for your email relay server.
Always make sure you test your settings to ensure you can send emails from your machine. If anything goes wrong, the error message that appears will usually tell you exactly what you need to fix.
Once your email server settings are configured, the second step is to configure the email format and rules for each directory. To configure the plugin, add or edit a directory and browse to the Emailer tab. The instructions assume you are evaluating the software or you have already purchased the plugin or a PRO unlock key.
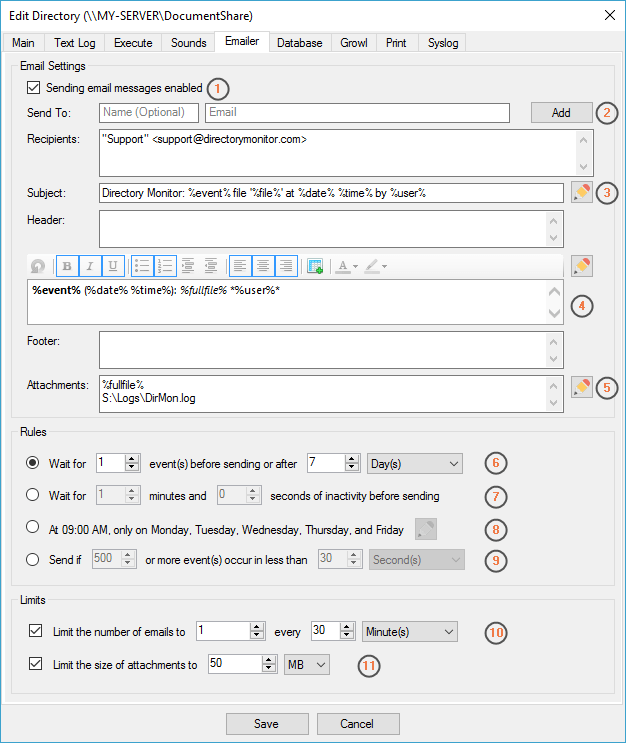
Enable sending email messages for the directory you are adding/editing.
Provide any number of email addresses that you want to receive the email that gets sent. These will be added to the recipients list just below.
Provide a subject for the email. You can use macros in this field, see the Macros section below for more details.
Provide a message body for your email. The default value is the format you will normally see in the Text Log tab. You can use macros in this field, see the Macros section below for more details. The body text will be duplicated multiple times if emails are combined into one based on your rules settings, see Rules section below for more details.
Provide any specific attachments to the email. The %fullfile% macro represents the path of the file that triggered the event. By default this will attach the file that was added/modified etc.
Warning: Be careful when using this option if you expect large files to change, your email server might block emails with very large attachments.
Use this rule to delay and combine sending emails after a certain number of events or periodically if those number events do not occur in the given time period.
Use this rule to delay and combine sending emails based on activity. This is useful to receive emails only after a batch of changes occur on a directory you are monitoring.
Use this rule to apply a specific schedule for when to send emails. Advanced schedules can also be configured in crontab syntax.
Use this rule to only send an email when a certain number of change events occur within a specific period of time. You will only get an email if enough events occur in the configured time frame.
Select appropriate throttling options to avoid being spammed or spamming your email server.
Warning: Emails that are prevented from sending due to throttling will not be queued for sending later, they will be lost. If emails are crucial for all changes, consider disabling any throttling options.
Optionally set the size limit of any attachments. This setting applies to each individual attachment and not all attachments together. You will get a warning in the log whenever an attachment that is too large gets ignored.
Schedules
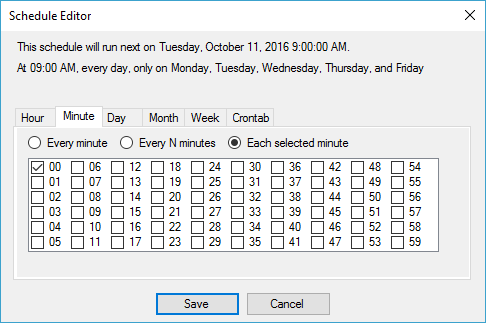
You can define schedules using the Schedule Editor or providing a crontab for fine control over when scheduled emails will be sent. Emails will not be sent on schedule if there have been no events since the last email was sent, so you should never get a blank email.
Macros
Macros are fields surrounded by % characters, these act as replacement fields that will contain values based on the actual event that occurs in the directory. To view all possible macros and edit the string, click the macro button next to the field in question.
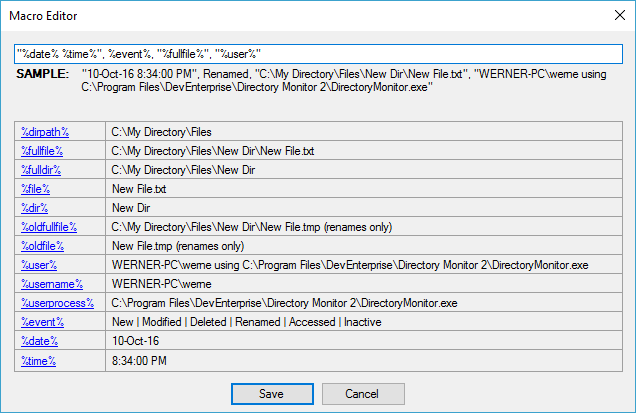
Not all macros are available depending on the Rules you have applied. This is because if events are combined, the macros may not be replaceable. For example, if you are waiting for two events to occur before sending and both a new file event and a modified file event occur, the %event% macro cannot be replaced because it will need to be both New and Modified. For this reason, you will be warned about using macros when making certain Rules changes.
Rules
The first rule is used for sending emails when a certain number of events occur or after a set period of time. Certain Macros will need to be removed if you are waiting for more than one event, this is explained in the Macros section above. When waiting for more than one event, the email body will be duplicated for each event. For example, if your body text is "Directory Monitor event: %event% %file%" and you are waiting for three events, your email body may look something like this:
Directory Monitor event: New something.txt
Directory Monitor event: Deleted something.txt
Directory Monitor event: New another_file.txt
The second rule is used for sending emails after a period of inactivity. This is useful for when you want to see a summary of all the changes that occurred in a directory after everything has settled down. Certain Macros will need to be removed because many different events could appear in each batch, this is explained in the Macros section above. When using this rule, the email body will be duplicated for each event. For example, if your body text is "Directory Monitor event: %event% %file%" and you are waiting for three events occur in your configured time period, your email body may look something like this:
Directory Monitor event: New something.txt
Directory Monitor event: Deleted something.txt
Directory Monitor event: New another_file.txt
Using Gmail
Set the sender to your Gmail address.
The SMTP server should be smtp.gmail.com and the port should be 587.
Select Username and Password and check to enable TLS.
Your username is your Gmail address and the password will be your Gmail password.
Test your settings and verify that you receive an email using the details provided.
Using Yahoo
Set the sender to your Yahoo! Mail address.
The SMTP server should be smtp.mail.yahoo.com and the port should be 587.
Select Username and Password and check to enable TLS.
Your username is your Yahoo! Mail account and the password will be your Yahoo! Mail password.
Test your settings and verify that you receive an email using the details provided.
Testing
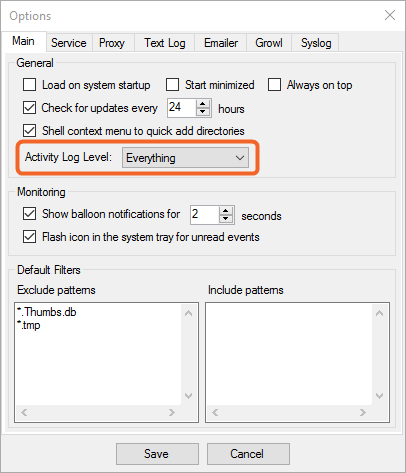
A good way to test the emailer plugin is to watch the Activity Log tab on the main screen. This tab will display warnings or errors that may be occurring while trying to send emails. For even more detailed information about what is happening inside the plugins you can select "Everything" in the logging options:
